


Aprilia Magnet
Specification | Reviews | Photos | Latest Price
Specification | Reviews | Photos | Latest Price
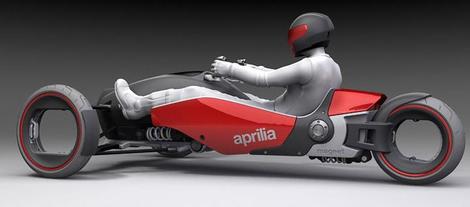
With all of the recent interest in the Piaggio MP3 and other tilting three wheelers, I thought I would revisit the Aprilia Magnet, a design project from a couple of years ago that never went beyond the concept stage but, to me, looks better than many of the more recent attempts to create a vehicle of this type. The design is the creation of Heikki Naulapää, a Finnish designer now working in Helsinki. The Aprilia Magnet was his degree project for the Royal College of Art. The Magnet went from sketches and Photoshop to 3D software, then a model was built for the Royal College of Art show in 2004 where it won "Best Design Project."
The Aprilia Magnet was designed to have a Formula 1 driving position, the lean of a motorcycle and a half outside feeling with the exposed seating. Power was to come from either a 550cc Aprilia V-twin engine or alternatively, electricity driving the electro magnetic drive system at each wheel, the source of the name "Magnet." It was designed to carry either one or two people and if you look at the images, you can imagine the feeling of driving this along a road filled with high speed sweeping curves. I think it would be a fantastic sensation.
If you have never seen this before you may wish to stop at his site and browse through the many images of the concept including photos of the completed model. It looks good, really good, and some of the companies thinking about tilting three wheelers these days should give Heikki a call and see about building this.
RCA Degree Project "Aprilia Magnet"
The concept for my degree project at RCA started from my dissertation (research work) during autumn 2002. In my dissertation I questioned "why people ride motorbikes". As a result of that, I finally created vehicle, which is based totally on riding sensation.
For images and more detailed information about the project flow, please take a look below.
Aprilia Magnet -project also won Pilkington automotive award; "The Best Design Project" at the Royal College of Art's Vehicle Design -degree show 2004.
Brief eplanation of the project; Project is based on riding sensation. I wanted to create a vehicle, which offers new kind of emotional experience while riding. I mixed motorbike's leaning character with formula one -type driving position and small sports car feeling with instruments and "being half-inside".
Main power source is small combustion engine (550cc) and drive to the wheels is done with electric engines in each wheel (including magnets, where the name comes from). There is also additional battery, which gives extra power for acceleration. Rider can also switch off combustion engine and slide slowly and silently in the landscape.
Magnet is capable to take pillion too -like a supersport motorcycles.
.........................................................................................
My degree project "flow" in a nutshell. Project started autumn 2003 with the research and finishing my disseration. My disseration was an important inspiration source and it directed my design path.
.........................................................................................
My degree project "flow" in a nutshell. Project started autumn 2003 with the research and finishing my disseration. My disseration was an important inspiration source and it directed my design path.
Around Christmas time, I knew basically what I'm trying to achieve with the project. That point I started to do some rough ideation sketching with pen and with Painter/Photoshop. Naturally I setup also some preliminary construction in Rhino too, to be able to see the real package and true proportions of the weird-proportioned three wheeler. I was really amazed how different three wheeler was from cars or the bikes, it just looked very odd from some angles!
Final design -phase started early January with quick 3D -modeling stage (one week) with sketching simultaneously. No sunshine hand renderings, just information for myself. After that period design of the vehicle was quite ready, but refining surfaces, proportions etc. and finishing all the details took about another month or bit more. So around end of February everything was ready to move to the final stage of the project; physical model making.
In addition to designing and working in 3D world, I have always liked model making too, so the process of making the "real thing" was a great fun. It was bit tricky to decide in the beginning, how to start and how to make all the parts in first place (and how to be able to put them together in the end), but it was a very enjoyable and interesting challenge. I didn't have experience of making such a complicated model before. I decided to make my model to the scale 40%, so the model became rather big (105cm in length). I felt that if I would have done smaller model, details would have become too tiny.
I had possibility to use rapid prototyping machine for most of the small parts, and some bigger ones as well. That was a big help, but unfortunately I had to do the most of the vehicle by hand anyway. Main volume, tires, wheels, wishbones, aluminium parts I had to do by hand and lathe/drill/etc. I wanted to use our nice five-axis milling machine at the College, but problem was that it was too occupied all the time...
Very big help for me was that I got 3D -rider made by my good friend Heikki Anttila. And same figure was 3D printed too at Solid Printing Solutions Ltd!
Reason I wanted to use milling machine was the fact, that I had all the 3D data of the parts ready and I didn't want to change anything on model making stage (not a single detail). So by doing the model by hand, I was just repeating my design from 3D. In practise before making each part, I just printed every view of the particular part and started hand milling. Take a look at the bottom of the page if you're interested how I did it. I used lots of different methods in order to be effective in model making process. 3D printing, foam modeling with hand/lathe/drill/etc. and silicon/resin casting just to mention some of them.
Finally, when all the pieces were made started a composing of the "thing". That was really interesting stage, because I was working with separate pieces, with only a misty figure how the vehicle would really look like when it is ready. It was really nice to see the magnet in a one piece in the end...


